Monday, April 29, 2024
Useful Resources for Brilliant Manufacturing, Operational & Industrial Intelligence Technology Enthusiasts!

Automation, Control & Plant Intelligence - Articles, Analysis, Reviews, Interviews & Views

OPC and DCOM: 5 Things You Need To Know

by Randy Kondor   |   January, 2008

OPC technology relies on Microsoft's COM and DCOM to exchange data between automation hardware and software; however it can be frustrating for new users to configure DCOM properly. If you have ever been unable to establish an OPC connection or transfer OPC data successfully, the underlying issue is likely DCOM-related. This whitepaper discusses the steps necessary to get DCOM working properly and securely.

A simple and effective strategy to establish reliable DCOM communication involves the following steps:

1. Remove Windows Security
2. Setup mutual User Account recognition
3. Configure System-Wide DCOM settings
4. Configure Server Specific DCOM settings
5. Restore Windows Security

In addition, the whitepaper covers troubleshooting tips to identify common OPC and DCOM problems, their symptoms, causes, and how to solve them. This will help integrators set up reliable and secure OPC connections.

1. Remove Windows Security

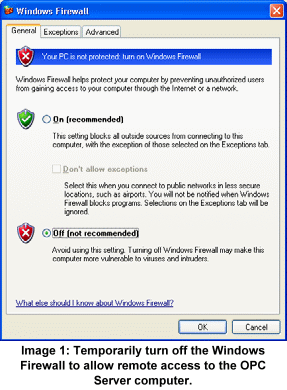
The first step to establish DCOM communication is to disable the Windows Firewall, which is turned on by default in Windows XP Service Pack 2 and later. The Firewall helps protect computers from unauthorized access (usually from viruses, worms, and people with malicious or negligent intents). If the computer resides on a safe network, there is usually little potential for damage as long as the Firewall is turned off for a short period of time. Check with the Network Administrator to ensure it is safe to turn off the Firewall temporarily. You will turn the Firewall back on in section 5, titled “Restore Windows Security,” on page 7.
To turn off the Windows Firewall, follow the steps below:
a. Click on the Windows Start button, select the Control Panel, and finally click on Windows Firewall.
b. In the General tab, select the “Off (not recommended)” radio button (refer to Image 1).

2. Setup mutual User Account recognition

To enable both computers to properly recognize User Accounts, it is necessary to ensure that User Accounts are recognized on both the OPC Client and Server computers. This includes all the User Accounts that will require OPC access.

2.1 Adding User Accounts

Ensure that both computers have access to the same User Name and Password combinations. User Names and Passwords must match on all computers that require OPC access. Note:
  • A User Account must have a User Name and Password. It is not possible to establish communication if a User Account does not have a Password.
  • When using Windows Workgroups, each computer must have a complete list of all User Accounts and Passwords.
  • When using a single Windows Domain, User Accounts are properly synchronized by the Domain controller.
  • When using multiple Windows Domains, you will either have to establish a Trust between the Domains, or add a Local User Account to the affected computers. (Refer to http://www.microsoft.com/technet/prodtechnol/windows2000serv/reskit/deploy/dgbe_s ec_ztsn.mspx?mfr=true about establishing a Domain Trust.)
2.2 Local Users Authenticate as Themselves
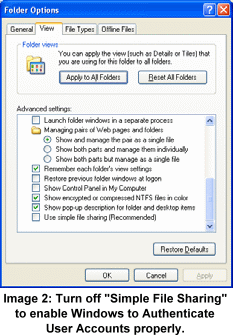
In Windows XP and Windows Vista, there is another setting that you should modify. This is not necessary in Windows 2000 or earlier. Simple File Sharing is always turned on in Windows XP Home Edition-based computers. By default, the Simple File Sharing user interface is turned on in Windows XP Professional-based computers that are joined to a workgroup. Windows XP Professional-based computers that are joined to a domain use only the classic file sharing and security interface. Simple File Sharing forces every remote user to Authenticate as the Guest User Account. This will not enable you to establish proper security. There are two ways to turn this option off. Either way will work. I personally prefer the second method because there are more security options that Windows exposes to me.

Method 1: Turning off Simple File Sharing

a. Double-click “My Computer” on the desktop.
b. On the Tools menu, click Folder Options.
c. Click the View tab, and then clear the "Use Simple File Sharing (Recommended)" check box to turn off Simple File Sharing (refer to Image 2).

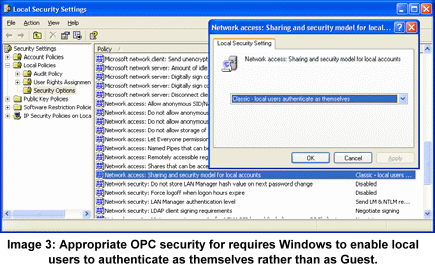
Method 2: Set Local Security Policies
  • Click on the Windows Start button, and then select Control Panel, Administrative Tools, and Local Security Policy. If you can’t see Administrative Tools in the Control Panel, simply select Classic View in the Control Panel. As an alternative to all of this, click on the Windows Start button; select the Run menu option, and type “secpol.msc”.
  • In the tree control, navigate to Security Settings, Local Policies, and finally select the Security Options folder (refer to Image 3).
  • Find the “Network access: Sharing and security model for local accounts” option and set it to “Classic – local users authenticate as themselves”.


3. Configure System-Wide DCOM settings

OPC specifications that precede OPC Unified Architecture (OPC UA) depend on Microsoft’s DCOM for the data transportation. Consequently, you must configure DCOM settings properly. It is possible to configure the default system-wide DCOM settings, as well for a specific OPC server.

The system-wide changes affect all Windows applications that use DCOM, including OPC application. In addition, since OPC Client applications do not have their own DCOM settings, they are affected by changes to the default DCOM configuration. To make the necessary changes, follow the steps below:

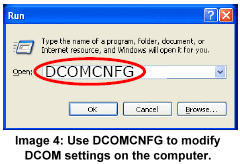
a. Click on the Windows Start button, and select the Run menu option (refer to Image 4).
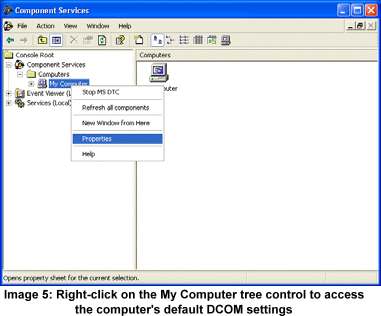
b. In the Run dialog box, type "DCOMCNFG" to initiate the DCOM configuration process, and click the OK button. The Component Services window will appear (refer to Image 5).
c. Once in the Component Services window (which is initiated by DCOMCNFG as above), navigate inside the Console Root folder to the Component Services folder, then to the Computers folder. Finally, you will see the My Computer tree control inside the Computers folder.
d. Right-click on My Computer. Note that this is not the “My Computer” icon on your desktop; rather it is the “My Computer” tree control in the Console Services application.
e. Select the Properties option.


Part 1  :    Part 2
Randy Kondor, President, OPC Training Institute, has more than 15 years of leadership experience building global OPC and security awareness and acceptance. An accomplished engineer, his vision and capable expertise have been a driving force in making the OPC Training Institute the world's largest OPC training company. Randy's success is due to the priority he has placed on educating industry about OPC standards. Education continues to be his focus today. His significant impact in the industry continues to be felt as ....... See Details....

YOU MAY LIKE:
Popular Articles

Manufacturing Insights